


Fendt Chassis Organizer

More functionality on your vehicle chassis
The chassis organizer is mounted on the hydraulic tank on the right-hand side of the vehicle. This provides space for a water tank, various attachment jaws and a toolbox.
The chassis organizer and the corresponding attachments are available for the Fendt 600 to Fendt 700 Vario series.
KEY FEATURES
Low installation effort
Interchangeable attachments
Customised
PRODUCTS
BASEPLATE

Part No.: X991635066000 [EAME]
CHASSIS ORGANIZER BASIS FOR FENDT 600 VARIO GEN1
Attention: Please note the torques and the maximum load of 35 kilograms!


Part No.: X991635067000 [EAME]
CHASSIS ORGANIZER BASIS FOR FENDT 700 VARIO SCR | S4 | GEN6
Attention: Please note the torques and the maximum load of 35 kilograms!

Part No.: X991635068000 [EAME]
CHASSIS ORGANIZER BASIS FOR FENDT 700 VARIO GEN7
Attention: Please note the torques and the maximum load of 35 kilograms!
ATTACHMENTS

Part No.: X991635071000 [EAME]
Hitch Bracket

Part No.: ACX392776A
Toolbox (small)
ATTENTION:
The following additional parts must be ordered:
1x base bracket, part no.: ACX4490320
1x locking piece, part no.: ACX3937530
2x retaining ring, part no.: ACX4182460
1x torsion spring, left, part no.: ACX4114390
1x torsion spring, right, part no.: ACX4114380
1x locking pin, part no.: ACX4182450
2x screw, part no.: ACW1022960
2x nut, part no.: ACW0863280
4x Buffers, part no.: 737812040740 [NA 72496736]
Optional:
1x Lanyard pin, part no.: ACW2909290

Part No.: X991635096000 [EAME]
FENDT STANDARD TOOLBOX
Only for the 700 series baseplates.
ATTENTION:
The standard toolbox cannot be used on the 700 SCR due to space restrictions.

Part No.: X991635069000 [EAME]
WATERTANK WITH SOAP DISPENCER
Can be mounted lengthways and crossways to the driving direction.
Supplied with a screw-in soap dispenser.
QUICK GUIDE
FENDT 600 VARIO GEN1 INSTALL BASEPLATE AND ATTACHMENTS
BASEPLATE

1st step
First remove the shown cover cap from the hydraulic tank cover on the right side of the vehicle.

2nd step
Place the base plate on the hydraulic tank cover as shown and align the screws.

3rd step
Now tighten the screws with a force of 25 Nm/ 18ft lb.
ATTACHMENTS

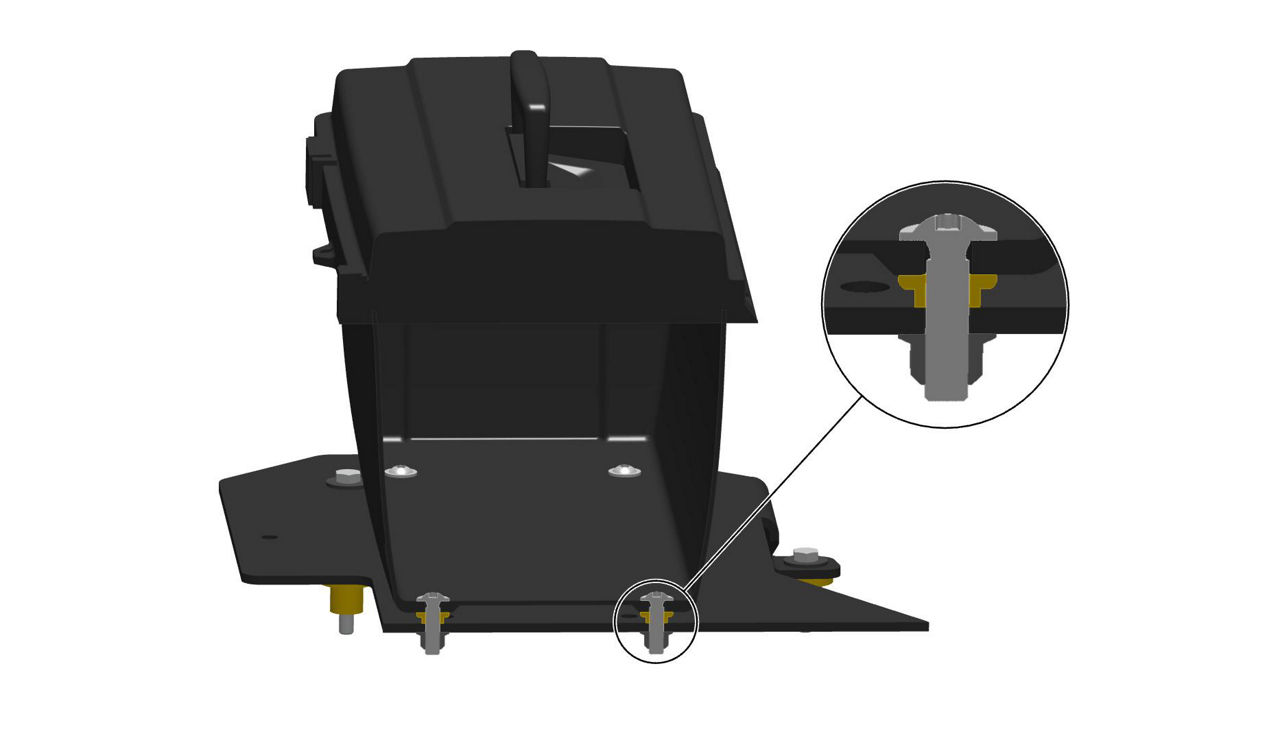
Attachment positions
Please use the indicated holes to attach the attachments.
The watertank can be attached either crosswise(A) or lenghtwise(B) to the direction of travel.

WATERTANK WITH SOAP DISPENCER
Mount the water tank using the supplied screws, washers and nuts.
The water tank can be mounted lengthwise or crosswise to the direction of travel; the exact screw position can be found in the attachment overview.
ATTENTION: Always check that the water tank is properly secured before driving!

TOOLBOX (SMALL)
Mount the toolbox with the supplied screws, washers and nuts.
The exact mounting points of the toolbox are shown in the attachment overview.
ATTENTION: Check that the toolbox is properly secured and locked before each departure!
NOTE: For the Fendt 600 Gen series, only the small toolbox is available for space reasons.

HITCH BRAKET
Mount the hitch bracket using the screws, washers and nuts provided.
The exact mounting points for the Hitch Bracket is shown in the overview of the attachments.
ATTENTION: When carrying a hitch, make sure that it is properly locked in the holder and check this before every drive off!
FENDT 700 VARIO SCR | S4 | GEN6 INSTALL BASEPLATE AND ATTACHMENTS
BASEPLATE

1st step
Remove the handle on the mudguard on the right-hand side of the vehicle.
Put the handle with the screws in a safe place.
Screw the new, shorter screws from the delivery into the holes.

2nd step
Open the catches and fold up the cover.

3rd step
Remove these three screws and this cover.

4th step
Loosen the 4 screws and remove the tank cover.

5th step
Now enlarge these 4 holes on the tank cover using a drill bit with an 18mm diameter bit.

6th step
Now insert the 4 distance sleeves included in the scope of delivery into the drilled holes.

7th step
Prepare the screws and washers that will be used for mounting.
Use the shorter screw for the shortened mounting.

8th step
Put the tank cover back on the tank and place the chassis organiser on the tank, positioning it as shown in the picture.
Now screw the chassis organiser and the tank cover together under the specified tightening point.
ATTENTION: Use a threadlocker in the form of an adhesive (e.g. Loctite 274) for the specified screw.
ATTACHMENTS

Attachment positions
Please use the indicated holes to attach the attachments.
The watertank can be attached either crosswise(A) or lenghtwise(B) to the direction of travel.
WATER TANK WITH SOAP DISPENCER
Mount the water tank using the supplied screws, washers and nuts.
The water tank can be mounted lengthwise or crosswise to the direction of travel; the exact screw position can be found in the attachment overview.
ATTENTION: Always check that the water tank is properly secured before driving!

TOOLBOX (SMALL)
Mount the toolbox with the supplied screws, washers and nuts.
The exact mounting points of the toolbox are shown in the attachment overview.
ATTENTION: Check that the toolbox is properly secured and locked before each departure!
FENDT STANDARD TOOLBOX
Mount the toolbox with the supplied screws, washers and nuts.
The exact mounting points of the toolbox are shown in the attachment overview.
ATTENTION: Check that the toolbox is properly secured and locked before each departure!

HITCH BRAKET
Mount the hitch bracket using the screws, washers and nuts provided.
The exact mounting points for the Hitch Bracket is shown in the overview of the attachments.
Attention: When carrying a hitch, make sure that it is properly locked in the holder and check this before every drive off!
FENDT 700 VARIO GEN7 INSTALL BASEPLATE AND ATTACHMENTS
BASEPLATE

1st step
Remove this screw.

2nd step
Place the base plate in this position and prepare the screws provided.

3rd step
Now tighten the screws to the appropriate torque.
ATTENTION: Use a threadlocker in the form of an adhesive (e.g. Loctite 274) for the specified screw.
ATTACHMENTS
ATTACHMENTS POSITIONS
Please use the indicated holes to attach the attachments.
The watertank can be attached either crosswise(A) or lenghtwise(B) to the direction of travel.

WATER TANK WITH SOAP DISPENCER
Mount the water tank using the supplied screws, washers and nuts.
The water tank can be mounted lengthwise or crosswise to the direction of travel; the exact screw position can be found in the attachment overview.
ATTENTION: Always check that the water tank is properly secured before driving!

TOOLBOX (SMALL)
Mount the toolbox with the supplied screws, washers and nuts.
The exact mounting points of the toolbox are shown in the attachment overview.
ATTENTION: Check that the toolbox is properly secured and locked before each departure!
FENDT STANDARD TOOLBOX
Mount the toolbox with the supplied screws, washers and nuts.
The exact mounting points of the toolbox are shown in the attachment overview.
ATTENTION: Check that the toolbox is properly secured and locked before each departure!

HITCH BRAKET
Mount the hitch bracket using the screws, washers and nuts provided.
The exact mounting points for the Hitch Bracket is shown in the overview of the attachments.
ATTENTION: When carrying a hitch, make sure that it is properly locked in the holder and check this before every drive off!
SAFETY
• Read the safety instructions carefully and follow all instructions and warnings.
• Make sure that the baseplates and attachments are correctly and securely mounted before operating the tractor.
• Do not exceed the maximum load limit of the base plates and attachments to avoid damage and accidents.
• Regularly check the fastenings and the condition of the base plates and attachments for wear or damage.
• Regularly tighten all screws and fasteners to ensure secure attachment.
• Make sure that all superstructures are properly secured to prevent them from falling while driving.
• Regularly clean the base plates and superstructures to prevent corrosion and wear.
• Store the superstructures in a dry and safe place when not in use.
• The watertank is only appropriate for summer use.
• The watertank is not appropriate for drinking water.


FAQ`s
- Can I order the Fendt chassis organizer ex works?
No, the Fendt chassis organizer are a retrofit solution. Can be ordered from all AGCO dealers via AGCO Parts.
- Are the chassis organizer available in all markets (EME, NA, ...)?
Worldwide!
- Which models in the Fendt range are compatible with the chassis organizer?
Currently, we only have chassis organisers for Fendt 600 Vario Gen1, Fendt 700 Vario Gen6 and Fendt 700 Vario Gen7.
- How are the base plates mounted on the tractors?
The baseplates are simply bolted to the hydraulic tank; more information can be found under ‘How to install and use’.
- Can I assemble the chassis organizer myself or do I need professional help?
Both the baseplates and the attachments can be easily mounted and changed without professional help.
- Is there a maximum load limit for the baseplates?
Yes! The maximum load limit of the baseplates is 35kg / 77lb.